


Little Blue Market uses a hybrid shipping setup powered by ShipStation. You can set your own flat rates with a shipping profile, or let the system calculate live carrier rates automatically based on your warehouse address and the customer's location. We recommend every vendor set up a General Shipping Profile as a baseline, since live rates may not fully cover costs on multi-vendor orders. Either way, start by saving your warehouse address in settings because everything else builds from there.
Shipping FAQs
How does shipping work on Little Blue Market?
Little Blue Market uses ShipStation as our shipping partner, integrated directly into your vendor dashboard. We use a combination of shipping profiles and live carrier rates to make sure customers always see accurate shipping costs at checkout. Importantly, vendors do not need to use ShipStation to fulfill orders!
Here's how it works: if you set up a shipping profile with your own flat rates, those rates will be used for your products at checkout. If you don't set up a shipping profile, the system will automatically fall back to live carrier rates calculated in real time through ShipStation based on your warehouse location, package details, and the customer's destination. Either way, customers will always see a shipping cost and nothing will be left blank at checkout.
Do I need to use ShipStation to generate labels and ship my orders?
No, ShipStation is our integrated shipping partner and is available to you directly through your vendor dashboard, but you are not required to use it. You are welcome to use your own shipping carrier, your existing Shopify shipping setup, or any other method you prefer to fulfill and ship your orders.
If you choose to ship outside of ShipStation or your Shopify integration, simply update the tracking number and carrier information on the order in your vendor dashboard so the customer receives their tracking notification and the order status updates correctly.
Do I need to set up a shipping profile?
We strongly recommend setting up a General Shipping Profile, even if you're also using live carrier rates.
Here's why: live carrier rates are calculated based on your individual package, but when a customer orders from multiple vendors in a single purchase, the live rate calculation may not fully account for the combined shipping costs across all vendors in that order. This can sometimes result in a shipping charge that doesn't fully cover what it actually costs you to ship your portion of the order.
Setting up a General Shipping Profile with a flat rate ensures you have a guaranteed minimum shipping amount for every order, regardless of how the live rate calculation handles multi-vendor carts. You can still use live rates for specific products if you prefer, but having a General Shipping Profile as your baseline protects you from being underpaid for shipping.
To set up your General Shipping Profile:
- Log into your vendor dashboard
- Go to Settings → Vendor Profile → Shipping Partners → Shipping Profiles
- Click Add Shipping Profile
- Name it something like "General Shipping" — this will apply to all your products by default, including any new products you add later
- Set your shipping zone — the geography you ship to (for most vendors this will be the United States)
- Set your flat rate — a fixed amount that covers your typical shipping cost (e.g. $5.99 per order)
- Save your profile
If you also have a warehouse address set up, live rates will still calculate where applicable, but your General Shipping Profile rate ensures you're never left short.
Can I set up a default shipping profile that applies to all my products automatically?
Yes, and we strongly recommend every vendor do this. A General Shipping Profile automatically applies to all of your products, including any new products you add in the future, and acts as your guaranteed minimum shipping charge for every order.
This is especially important because live carrier rates may not fully account for shipping costs when a customer's order includes products from multiple vendors and the calculation can sometimes underestimate what it actually costs you to ship your items. A General Shipping Profile with a flat rate protects you from this by ensuring you always receive at least a set amount for shipping, no matter how the cart is split across vendors.
If you have specific products that need different shipping rules (for example, a heavier item that costs significantly more to ship) you can also create a Custom Shipping Profile for just those products.
How the two work together:
- Your General Shipping Profile is your default and safety net — it applies to everything
- A Custom Shipping Profile overrides the general one, but only for the specific products assigned to it
- All other products continue to use your General Shipping Profile automatically
Most vendors only need to set up their General Shipping Profile once, and can add Custom Shipping Profiles later only for exceptions that need a higher rate.
Instructions to Set Up a Shipping Profile with Flat Rates
- Go to Settings → Vendor Profile → Shipping Partners → Shipping Profiles
- Click Add Shipping Profile
- Give your profile a name: for example "Standard Shipping" or "Small Items"
- Set your shipping zone: the geography you ship to (for most vendors this will be the United States)
- Set your flat rate: a fixed amount charged per order (e.g. $5.99 per order)
- Save your profile
If you have products with very different shipping needs (for example, small greeting cards versus large framed prints) you can create multiple profiles and assign different products to each one.
What is the difference between a flat rate and live carrier rates?
Flat rate means you set a fixed shipping charge that customers pay regardless of what they order or where they live. This is the simplest option and works well if your products are similar in size and weight. Customers appreciate the predictability and they know exactly what shipping will cost before they check out.
Live carrier rates via ShipStation means the system calculates the actual shipping cost in real time at checkout based on your package weight, dimensions, and the customer's location. This is more precise and ensures customers are charged exactly what it costs to ship to them. It requires your warehouse address to be set up correctly in your vendor profile.
Which shipping setting should I use?
Flat Rate
- Setup required? Yes, create a shipping profile
- Best for vendors with similar-sized products
- Customer experience: simple, predictable
- What you control: the exact amount charged
Live Rates
- No, works automatically if warehouse address is set
- Best for vendors with varied product sizes and weights
- Customer experience: Precise, varies by location
- What you control: nothing, rates are set by the carrier
If you're just getting started, live rates with your warehouse address configured is the easiest path. If you want more control over what customers pay, set up a flat rate profile.
Important reminder: you can use a combination of both! Set a flat rate for some products and live rates for others.
How do I generate a shipping label when I get an order?
Little Blue Market is integrated with ShipStation, so you can generate labels directly from your vendor dashboard without logging into ShipStation separately.
- Go to Orders in your vendor dashboard
- Click on the order you want to ship
- Click the Generate Label or Ship button
- Confirm the package weight and dimensions
- Select your carrier and service level
- Generate the label, download and print it immediately
Once the label is generated, tracking information updates automatically and the customer receives a shipping notification.
If you use Shopify: You can also fulfill orders and generate labels directly from your Shopify admin using your existing ShipStation setup — whichever workflow you prefer.
Can I use my own shipping carrier or account?
Yes. If you already have your own carrier account you can connect it through ShipStation and your negotiated rates will be available when you generate labels.
If you already use ShipStation with your Shopify store, your existing carrier connections will carry over automatically once your store is connected to Little Blue Market.
If you use another shipping platform, use flat rate to set your shipping rate and use your own platform to print label and ship.
Where do I add order tracking information if you print outside of Little Blue Market?
If you purchase and print your shipping label through your own carrier rather than through the platform, you'll need to add your tracking information manually so your customer stays in the loop.
Here's how:
- Go to Orders in your vendor dashboard
- Select Shipper for the relevant order
- Click Add tracking manually
- Enter your carrier name, tracking number and/or tracking link, and estimated shipping cost
- Save
That's it — your customer will be notified and you'll have a record of the shipment in your dashboard. Please do this as soon as your label is printed so shoppers aren't left wondering where their order is.
How do I offer free shipping?
You can offer free shipping by creating a shipping profile and setting the flat rate to $0.00. You can apply this to all your products or to specific products only by creating a separate profile for those items. Keep in mind that if you offer free shipping, the cost of shipping comes out of your earnings — so make sure your product pricing accounts for that.
How to Set Up Free Shipping For Orders Over Certain Total
Setting up free shipping when shoppers reach a certain spend amount is a a great method to increase sales. Here's exactly how to set it up in your vendor dashboard.
Step 1 — Go to your Shipping Profile
In your vendor dashboard go to:
Settings → Setup and Configuration → Shipping Profile
Step 2 — Create a new shipping profile
- Click "Add Shipping Profile"
- A pop-up will appear
- Give the Profile a name like "Free Shipping"
- Add zone for where free shipping applies (for example the United States)
- Click add rates next to zone
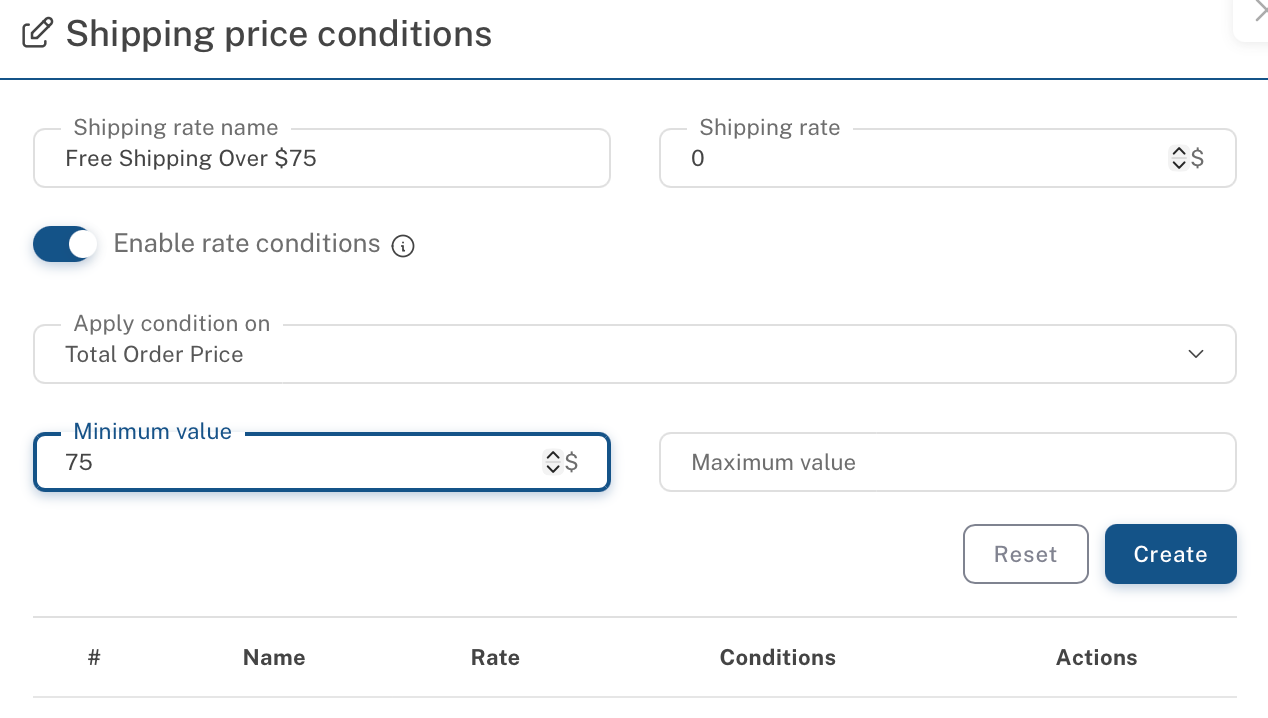
Step 3 — Add your free shipping rule
- Name the Shipping Rate and enter $0
- Enable rate conditions
- Apply rate condition on total order price
- Enter the minimum value for free shipping, for example $75
- Click Create to save rate
Step 4 — Ensure you have a General Shipping Profile for orders under Free Shipping limit
If you do not, you must add a second rule for orders that don't qualify for free shipping:
- Rule type: Order value
- Maximum order value: one penny below free shipping limit. For example, Free Shipping over $75, maximum order value for this rule is $74.99.
- Shipping cost: your standard rate (e.g. $7.00)
- Create
Can't find what you're looking for?
Send us an email to tell us what's up and someone from our Customer Service team will get back to you as soon as possible. Be sure to include your order number (if you have one).
Please email us at market@littlebluecart.com.